Tuesday, June 30, 2009

Burgers, baby bok choy, and cupcakes!

Grilling in the rain! We had burgers on the grill made from tasty local beef mixed with whatever herbs and spices my husband mixed in. Topped with baby greens and Cambozola, the burgers were perfect. We also tried grilling garlic scapes. My husband thought they were okay but I wasn't really a fan. I much preferred using the garlic scapes in pesto!
I cooked the baby bok choy
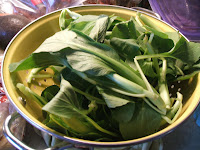
we got in our farm share for our side dish. In 1T vegetable oil and a few drops of sesame oil, I let 1t garlic, 1 inch of grated ginger, and 1 sliced shallot cook 'til they were fragrant. Then I tossed in the bok choy and turned the greens 'til they were coated in the garlic, ginger, and shallots. The leaves wilted quickly and then I added some water and covered the pan to let the stems steam for about 3 minutes.
Oh, and don't forget dessert!
I made chocolate cupcakes starting with a recipe from Smitten Kitchen. I only used 6 oz of chocolate and it worked out just fine. I added strawberry puree (leftover from Sunday and the crepe adventure) as a middle layer as I spooned the batter in the pan.
It probably would have been better to just mix the puree into all the batter as the layer just bubbled up and out making a little bit of a mess. Finally, my husband said he couldn't stand to see such naked cupcakes so he had to make frosting!
We didn't have a full 8 0z of cream cheese so he used what we had, butter, powdered sugar, and maple syrup and mixed it up for the frosting. This cupcake recipe is great and would work well with many additions like berries, nuts, chips, etc. Yum!

Monday, June 29, 2009

Sunday and strawberry crepes!

Yesterday we woke to a lovely and sunny Sunday morning. We had two morning glory blooms and a couple ripe black raspberries to nibble off the bushes. In the fridge were the last of the fresh strawberries from this week's farm share. A little birdie put the idea of pancakes in my husband's head and away he went. He stores recipes in his head like some people know their sports trivia. His crepe recipe follows the Joy of Cooking French Pancake recipe pretty closely, I believe. And he is a big fan of making sweet and savory stuffings for them. This morning it was a sweet strawberry filling that won out.
First, he made a puree of about a pint of strawberries.
Next, he mixed this with creamy goat cheese for a smooth, pink filling. After he had cooked a plateful of pancakes he started rolling them up with the strawberry cheese filling. Next it was breakfast on the back porch!

Thursday, June 25, 2009

Thursday night.

Dinner tonight...steak fajitas, green salad, and dessert!
I found some sirloin strips for a good price so I snatched them up today at the store. I had planned to make lamb saag tonight but the beef changed my plan. I stuck the meat in a marinade of chili powder, cumin, cayenne, salt, pepper, and oregano. I think I over did it on either the chili powder or the cumin because the meat cooked so fast and one of those powders didn't get to cook off enough.
I grilled green peppers and onions in oil, salt, pepper, oregano, and pepper flakes. And then in a hot pan I cooked the meat in small batches. We ate the fajitas with some guacamole, salsa, cheese, cilantro, and lettuce. YUM!
The green salad was greens and radishes from our farm share and cucumbers and carrots from the grocery store.
And dessert...strawberry and rhubarb cobbler with fresh fruit from our farm share. Only it wasn't as delicious as I'd hoped. The rhubarb needed to be cooked before going in the dish as it was still crunchy. And I added baking soda instead of baking powder and so the topping tasted metallic. And finally there is too much tapioca in the recipe for my liking as a serious jelly developed leaving no juices to be sopped up by the topping. Oh, well.

Chicken Tikka Masala

Often when I get up in the morning, my husband has already left for work and he’s left the TV on the Weather Channel. I grab a cup of coffee and my laptop and sit on the couch for a few minutes until I catch the Local on the 8’s. Then I usually flip the channel to BBC America and leave the news on in the background while I am getting ready to go to school. Well, leaving BBC America on in the morning has created a little Gordon Ramsay obsession for me. You see, Kitchen Nightmares comes on at 8 am and so I sometimes watch about half the show while I am eating breakfast before I catch the bus. In any case, I managed to watch a few episodes of the f word as well, though I think Kitchen Nightmares is my fave! This led me to visit Channel 4s food page and I found this Chicken Tikka recipe.

In 2T oil I cooked 1 onion halved and sliced thinly for about 3 minutes. Then I added 2 green serrano peppers (deseeded and chopped), 3 cloves of garlic (pressed), and slightly more than an inch piece of ginger (grated).

I cooked this for 2-3 minutes. I added the chili powder (1/2t), tumeric (1t), garam masala (2t) and brown sugar (1T). I stirred this and let it cook for another couple of minutes until it was quite fragrant.This step really helps the aromatics of the spices come out so the deep flavor of the sauce can develop.

I then added tomato paste (1T) and diced tomatoes (1 14 oz can). (I really like the Muir Glen Fire Roasted tomatoes!) I let this simmer for 3-5 minutes and turned off the heat. This is a good stopping point if you want to leave the sauce to sit before you cook the meat.

I used 2 chicken breasts (the recipe calls for 4) and it was a good ratio of meat to sauce but then again, I love sauce!

I diced the chicken and put it in the empty (but not clean) pan with 1T additional oil. I let it get color on all sides but I didn’t cook it all the way through. I added the sauce back and let it simmer for 10-15 minutes.

Next, I put the sauce in the food processor and blended it until smooth. I served this over basmati rice, with yogurt and cilantro. Yum!


Monday, June 22, 2009

Baked Beans

In my book, baked beans are just the perfect addition to summer food off the grill. Whether its hot dogs and hamburgers, BBQ chicken, or pork chops, baked beans will always compliment a grilled meal! And beans pair nicely with a cooling item like coleslaw or a pasta salad.

I must warn you that what follows isn’t a strict recipe as my baked beans are never the same twice, but I do have a general method to my madness. I start with canned baked beans, which is cheating right off the bat, but it turns a full day or even overnight process and into a 30-45 minute breeze of a project.

The following ratios are based on using a 28 oz. can of vegetarian baked beans. I usually buy the store brand but Bush’s are tasty too. Then I add about…
1T of something sweet like molasses or brown sugar

2T ketchup

1T of yellow mustard or 1t dry mustard (I like Colman’s)

2T diced onion or 1t onion powder

1-2t black pepper

1-2t Worchester sauce (don’t add if you want to keep them vegetarian)

1T of something vinegar-y like apple cider vinegar or if you want some heat the vinegar with peppers in it.

Sometimes I add pinches of things like dried oregano, cumin, or chili powder.

I stir all the ingredients together and bake it at 325-350 for an hour or if you need it sooner you can up it to 375-400 and aim for 20-30 minutes, stirring occasionally. None of the ingredients need to be cooked so it is just a matter of the flavors having time to meld. Baked beans are best if they are bubbling but not getting dry and crispy around the edges.

Wednesday, June 17, 2009

Jam!

I made my first foray into jam making today. Yesterday I went berry picking and ended up with nearly 10lbs of fresh strawberries. This morning I set out to make a batch of strawberry jam. I used a recipe from Gourmet (1999) that I found referenced on the beautiful blog Basil and Ginger.
I used 3 lbs. of strawberries (washed, hulled, and quartered), 3C of sugar, and 1/3C lemon juice. Aside from my timing being all off (the jam was ready and the jars weren't) it was much easier than I'd imagined.
I mashed the berries in the stock pot and let them simmer for 10 minutes, stirring frequently. Then I added the sugar and lemon juice, stirred for about 2 minutes and then brought the mixture to a full boil. After about 5 minutes it really started to roll, bubble, and froth. I skimmed the foam off and stirred it quite frequently. I had chilled a plate in the freezer so I could check the consistency and after about 15 minutes it seemed to be jelling nicely. If the jars had been ready it would have been a snap. I had to wait for the jars to boil for 10 minutes and the lids for 5 minutes. Then I filled the jars (5 1/2 pint jars), leaving 1/4 inch headspace, put on the lids, screwed on the rings and put the jars back in the water bath for 15 minutes. I pulled them out and let them cool on a rack. And they all popped indicating they were sealed!
The second batch I made tonight went much more smoothly. I got the jars boiling before I even began the jam making and let them sit in the water bath until I was ready to fill them.
In this batch I used about 5C strawberries, 1C raspberries (frozen from last summer), and 2C rhubarb (fresh from our farm share today), 3C sugar, and 2T lemon juice. I used the same method as above for cooking up the mix and ended up with 4 1/2 pint jars.
I lucked out finding the Ball canning kit with the jar tongs, a magnet to get the lids out of boiling water, a canning funnel, and a little tool to measure the headspace. However, I had much less luck finding a round cooling rack to fit in the bottom of the stock pot. All the racks I found were 12 inch cake racks and they don't fit in the stock pot, it would have to be about 11 1/2 inches instead, argh. I put the jars right on the bottom of the pot and they didn't break, but that may have been good luck!

Monday, June 15, 2009

Ribs, Collards, Dinner Rolls, and Watermelon: It must be SUMMER! (almost)

Tonight for dinner we had ribs, collards, freshly baked dinner rolls, and a big bowl of watermelon. The ribs were slow cooked with a dry rub using a recipe from Cooks Illustrated (July/August 2002). I used their dry rub method but I cooked them in the oven instead of over a hardwood fire. They lacked the smoky flavor but were still delicious!

Dry Rub for 2 racks of Baby Back Ribs

1T + 1/2t paprika

1 1/2t chili powder

1 3/4t cumin

1 1/2t brown sugar

3/4t oregano, dried

3/4t table salt or 1 1/2t kosher salt

3/4t black pepper

1t white pepper

1/2t cayenne pepper

I cut the racks into 3-4 rib pieces and applied the dry rub.

I put them in a Ziploc bag in the fridge for about 3 hours but you could let them sit overnight. I put them in a baking pan, covered it with foil, and baked them for 3 hours at 250 degrees. Every ½ hour I flipped them over. After 3 hours, I uncovered them and turned the heat up to 400 degrees. I cooked them for 12 minutes and turned them over and cooked them for another 6 minutes. YUM!

I used a collard greens recipe from Simply Recipes and managed to halve the amount of collards and most other things except the sesame oil, whoops. They were great other than that little slip!

And my husband made the rolls, which means I have no idea what he did. I saw some warm water go in a bowl with some yeast and sugar. He whisked that and added some vegetable oil. Then he started adding flour (2C+) until he had the desired consistency.

Then he kneaded the dough with more flour, caraway seeds, fennel seeds, and garlic powder. He made dough balls, placed them in a buttered dish, and baked them at 400 degrees for 20 minutes.

Sunday, June 14, 2009

Borrowed Recipes!

Dinner tonight came from existing recipes, which all worked out pretty well! I made pork chops and a cherry dessert using recipes from the blog Simply Recipes. And I made kale with white beans using a recipe from Recipe Zaar.

Vermont Maple Syrup Pork Chops
I followed the recipe pretty closely but I only made 2 chops rather than 6. Instead of making only 1/3 the sauce I went ahead and made 1/2. I was glad to have the extra as the thickened gravy is delicious. Unfortunately the gravy was especially necessary because even taking 10 minutes off the cook time the chops were still overcooked. The recipe calls for 45 minutes and I set the timer for 35 minutes and wished I had taken them out 5 minutes sooner. I would suggest checking at 25 or 30 minutes with a meat thermometer. Pork should be cooked to 160 degrees but remember it keeps cooking after you take it out of the oven so anything above 150 should be fine.

I followed this recipe to the tee except that I didn't have a tomato so I left that out. I would suggest using only 1T of brown sugar or maybe even none at all, except that if you include the tomato maybe it balances out the sweetness more. And I would add an extra 1T of balsamic. Additionally, there wasn't enough liquid to steam the kale, which also may be remedied by including the tomato. But I wished I had added a few tablespoons of water at the end when the recipe suggests covering the dish to melt the cheese with steam.

This is a delicious dessert. It was great as is but next time I'll use slightly less almond extract and more actual almonds. I would suggest 1/2t extract rather than the 3/4t the recipe calls for and 4T almonds rather than 2T. We served this to guests with whipped cream but when we ate it ourselves later we decided it really didn't need it! Also, I used Balaton cherries, which are simply perfect cherries.

Quinoa

I have recently been experimenting with the South American grain, quinoa, which as far as I know is pronounced keen-wah. I have found it works really well in a chilled salad like couscous would. I have done some Google searching and found a number of ways to cook it and the one that works best also seems to be the best way to destroy a plastic strainer. Basically, quinoa wants to be boiled for about 10 minutes and then either let it sit in the water or strain it and let it sit in the strainer over an inch of steaming water for about 10 more minutes. If you use a plastic rimmed strainer and sandwich it between the pan and the lid, you will melt the strainer!

1C quinoa

1 can black beans, drained and rinsed

2T cilantro chopped

1/4C green onions or red onion, chopped finely

Lime juice, salt, and pepper to taste

Optional…jalapeno (fresh, finely chopped with seeds removed), tomato (canned or fresh), mango or pineapple

Friday, June 12, 2009

Garlic Scape Pesto

After discovering that garlic scapes exist, I started searching for various pesto recipes. I didn’t pick one, I just took the general ingredients and ratios and went to town. I started by slicing the 7 garlic scapes from the farm share into 3 inch pieces. 

Then I put the scapes, 1/4C parmesan cheese, and 5T of olive oil in the food processor and mixed. Whoa! Those “mild” garlic scapes are garlicky! So I discovered the trick with this type of pesto is that the greens and the garlic are all in one so it is the other ingredients that have to mediate those flavors.

(I also discovered that it is hard to keep track of my usual method of cooking. I found myself having to make little tic marks on a notecard while I was adding ingredients and then I tallied them up at the end.)

In a food processor mix:

7 garlic scapes

1/2C parmesan cheese

3/4C walnuts

1/2C olive oil

2T lemon juice

1/4C water


After the fact, I noticed that at least one recipe suggests mixing the cheese in after rather than processing it. I think this is true of other pesto recipes too. It isn’t what I did, but I think it is a better idea! Let me know if you try it. 

I ate this with pasta and cherry tomatoes, which was tasty. A couple of people who sampled it last night suggested it would be a really good spread for bread or crackers. (I know the picture isn't really appealing, but I wanted to show you that it turns out to be a really light shade of green.)

We had a salad on the side using that beautiful head of lettuce that is now my profile picture. Along with that tasty lettuce, I tossed in carrots, cucumber, those fresh snap peas I picked on Wednesday, scallions, and green peppers. I also added garbanzo beans, which is a salad fave for us. Our grocery store sells 7.5oz. cans, which is the perfect amount for a salad! 

(Note in the picture the beautiful salad hands that my hubby made!)

Thursday, June 11, 2009

Antipasto Orzo Salad

Finally, a recipe! So I haven't tried the garlic scape pesto yet, but it is next on my list for the day. I have been anxious to get an actual recipe up so I am going to post this salad, which I made on Monday and we finished the leftovers yesterday.

This is cold pasta salad that combines the flavors common on a traditional antipasto plate. And it tastes delicious the next day for lunch too!

1C orzo, cooked and cooled

2T salami, diced

2T ricotta salata, crumbled (I am sure parmesan, asiago, or fresh mozzarella would be tasty too!)

1/4C olives, diced (I used a combination of Greek green, kalamata, and nicoise.)

1T fresh basil, chopped

1/2T fresh oregano, chopped

½ to 1T olive oil (My husband recently introduced me to Trader Joe’s Kalamata oil, which is delicious!)

black pepper

Served with pepperoncini

I cooked the orzo according to the instructions on the box, while preparing the other ingredients. Once cooked, I strained the orzo and ran it under cold water to stop it from overcooking and to chill it for the salad. I then tossed all the ingredients together and added enough olive oil to keep the orzo from clumping and pepper to taste.

This was tasty with a few pepperoncini peppers on the side!


First Farm Share of the Season!

My husband and I bought a farm share for the season this year. We started with one over the winter that was great, but boy oh boy did it push our creativity to the limits with root veggies! There are three farms involved in the collective. Over the winter we had the share delivered, but I'll be picking up the share all summer. Yesterday was my first visit to the farm and it was so much fun! 
I walked in with my bags to fill up and was walked through the process by one of the organizers. There is a chalkboard listing what items are available and which ones are limited so that each member can get their share. I got a few potatoes from last season, beautiful red radishes, and a few white Hakurei turnips. Then I gathered up some beautiful spring greens, purple kale, collards, and the cutest head of lettuce (see my profile pic!). I also picked up 7 (that was the limit) garlic scapes (see pic in orange colander). I had to do a Google search on these! 
 The most common recipe was for garlic scape pesto so I think I'll try that out tonight and let you know how it goes. I guess the scapes are the growth from hard stem garlic heads and are usually trimmed to encourage further growth in the bulb. 
After filling up my bag with these items, I went out to the fields to pick some of my own food. Each member was allowed to pick up to 1 qt. of strawberries (see pic at the bottom of the blog) and 1 pint of snap peas. I also gathered a few herbs: chives, thyme, and sage. 

Tuesday, June 9, 2009

To blog or not to blog?...To blog!

Sometimes all it takes is one little suggestion swirling around in your head to motivate you to try something new. I only wish this time the suggestion that settled in my head had been start exercising everyday or stop procrastinating on your dissertation proposal. But this time it was you should start a blog. So here it is, my new blog: At home with a couple of foodies. 

My goal is to post recipes from our day-to-day adventures with food. We love cooking and we love trying new things. My husband almost never uses a recipe and I tend to use recipes as a jumping off point. I will try to give you a healthy dose of each of our experiments. 

I think I have started this blog for two main reasons. First, I hope it works as a way to share recipes with those friends and family members who've enjoyed eating with us and are occasionally looking for inspiration in the kitchen. Second, I hope it works as a resource for us to record what we've done so as to improve our recipes and eating habits! 

Feedback and comments are always welcome! Let me know how the recipes work out in your kitchen. And please let me know how you've changed and improved on our ideas.